Installation and Deployment Guide for Industry-Grade Nginx Reverse-Proxy Load-Balancing Server with SSL Integration
This documentation provides instructions on how to install and deploy an industry-grade nginx reverse-proxy load-balancing server with optimal SSL integration.
sudo apt-get update
sudo apt-get install openssl
sudo apt-get install nginx
Step 3 – At the end of the installation process, Debian starts Nginx. The web server should already be up and running.
systemctl status nginx
Output
● nginx.service - A high performance web server and a reverse proxy server
   Loaded: loaded (/lib/systemd/system/nginx.service; enabled; vendor preset: enabled)
   Active: active (running) since Tue 2022-06-28 18:42:58 UTC; 49s ago
     Docs: man:nginx(8)
 Main PID: 2729 (nginx)
    Tasks: 2 (limit: 1167)
   Memory: 7.2M
   CGroup: /system.slice/nginx.service
           ├─2729 nginx: master process /usr/sbin/nginx -g daemon on; master_process on;
           └─2730 nginx: worker process
This output reveals that the service has started successfully.
Step 4 – Now that you have your web server up and running, you can review some basic management commands.
To stop your web server, type:
sudo systemctl stop nginx
To start the web server when it is stopped, type:
sudo systemctl start nginx
To stop and then start the service again, type:
sudo systemctl restart nginx
If you are making configuration changes, Nginx can often reload without dropping connections. To do this, type:
sudo systemctl reload nginx
By default, Nginx is configured to start automatically when the server boots. If this is not what you want, you can disable this behavior by typing:
sudo systemctl disable nginx
To re-enable the service to start up at boot, you can type:
sudo systemctl enable nginx
mkdir -p /etc/nginx/ssl/example.com
cd /etc/nginx/ssl/example.com
openssl genrsa -des3 -out server.key 2048
openssl rsa -in server.key -out server.key
openssl req -new -key server.key -out server.csr
Fill all the fields they ask you however you want, but pay attention the this particular field:
Common Name (e.g. server FQDN or YOUR name) []:
- Example:
Common Name (e.g. server FQDN or YOUR name) []: example.com
Step 9 - Use this CSR(server.csr file) to obtain a valid certificate from a certificate authority(Example: NO-IP, Namecheap etc).
-> After you buy an SSL certificate from the certificate authority that you like, you then upload the CSR(server.csr file) to them and request a valid certificate.
-> You will then wait for them to verify your request and then they will notify you par email. (Take about 30 minutes to 24 hours depending on the certificate authority)
-> Once your Certificate is approved, you then go back their plathform and download the 'PEM Chain' file and the 'CRT Package' zip that contains individual root, intermediate, and end-entity certificate files.
-> After you are done, you will have a .pem file and a zip usually containing three .crt files.
touch ca-certs.pem
nano ca-certs.pem
Paste text inside and then save.
Step 11 - You have to merge all the .crt files in the 'CRT Package' zip into a single .crt file named 'server.crt' with a specific order.
touch server.crt
nano server.crt
Order:
1. Paste the text inside the .crt file that start with the hostname, for exemple: example_com.crt
2. Paste the text inside the .crt file of the root, for exemple: TrustedRoot.crt
3. Paste the text inside the .crt file of the certificate authority, for exemple: DigiCertCA.crt
4. Save.
After you finish the server.crt should look something like this:
-----BEGIN CERTIFICATE-----
PASTE 1 TEXT HERE
-----END CERTIFICATE-----
-----BEGIN CERTIFICATE-----
PASTE 2 TEXT HERE
-----END CERTIFICATE-----
-----BEGIN CERTIFICATE-----
PASTE 3 TEXT HERE
-----END CERTIFICATE-----
ls /etc/nginx/ssl/irondev.dnsfor.me
Output
ca-certs.pem server.crt server.csr server.key
- if you don't have all these 4 files there, then you have to repeat the previous steps again.
touch /etc/nginx/sites-available/example.com
nano /etc/nginx/sites-available/example.com
Paste this inside it:
upstream example_com {
    server localhost:8080;
    #server localhost:8081;
    #server localhost:8082;
}

server {
    listen 443 ssl;
    server_name example.com www.example.com;

    #ssl on;
    ssl_certificate         /etc/nginx/ssl/example.com/server.crt;
    ssl_certificate_key     /etc/nginx/ssl/example.com/server.key;
    ssl_trusted_certificate /etc/nginx/ssl/example.com/ca-certs.pem;

    ssl_session_cache shared:SSL:20m;
    ssl_session_timeout 10m;

    ssl_prefer_server_ciphers  on;
    #ssl_protocols              TLSv1 TLSv1.1 TLSv1.2;
    ssl_protocols              TLSv1.2;
    ssl_ciphers                ECDH+AESGCM:DH+AESGCM:ECDH+AES256:DH+AES256:ECDH+AES128:DH+AES:ECDH+3DES:DH+3DES:RSA+AESGCM:RSA+AES:RSA+3DES:!aNULL:!MD5:!DSS;

    add_header Strict-Transport-Security "max-age=31536000";

    location / {
        proxy_pass http://example_com;
        proxy_set_header Host $host;
        proxy_set_header X-Real-IP $remote_addr;
        proxy_set_header X-Forwarded-For $proxy_add_x_forwarded_for;
        proxy_set_header X-Forwarded-Proto $scheme;
    }
}

server {
    listen 80;

    server_name example.com www.example.com;

    return 301 https://$server_name$request_uri;
}
- The configuration above will make the reverse proxy server listen on both the ports 80 and 443 of the domains example.com and www.example.com
- If the USER used HTTP protocol by coming through port 80 then the server will forward the request to port 443 to force SSL and the use HTTPS protocol.
Like this:
http://example.com ==> https://example.com
http://www.example.com ==> https://www.example.com
Then it will transfer the request to the local HTTP server (localhost:8080) as seen bellow:
upstream example_com {
    server localhost:8080;
You can change that line to match whatever environment and situation you have in your machine.
The proxy_set_header directive is used to pass vital information about the request to the upstream servers.
ln -s /etc/nginx/sites-available/example.com /etc/nginx/sites-enabled/example.com
rm /etc/nginx/sites-enabled/default
/usr/sbin/nginx -t
Output
nginx: the configuration file /etc/nginx/nginx.conf syntax is ok
nginx: configuration file /etc/nginx/nginx.conf test is successful
This output reveals that the configuration syntax is correct and that test ended successfully.
systemctl restart nginx
systemctl status nginx
Output
● nginx.service - A high performance web server and a reverse proxy server
     Loaded: loaded (/lib/systemd/system/nginx.service; enabled; vendor preset: enabled)
     Active: active (running) since Thu 2023-02-23 00:27:30 +01; 2h 13min ago
       Docs: man:nginx(8)
    Process: 1847676 ExecStartPre=/usr/sbin/nginx -t -q -g daemon on; master_process on; (code=exited, status=0/SUCCESS)
    Process: 1847677 ExecStart=/usr/sbin/nginx -g daemon on; master_process on; (code=exited, status=0/SUCCESS)
   Main PID: 1847678 (nginx)
      Tasks: 5 (limit: 9373)
     Memory: 5.2M
        CPU: 1.012s
     CGroup: /system.slice/nginx.service
             ├─1847678 nginx: master process /usr/sbin/nginx -g daemon on; master_process on;
             ├─1847679 nginx: worker process
             ├─1847680 nginx: worker process
             ├─1847681 nginx: worker process
             └─1847682 nginx: worker process

Feb 23 00:27:30 server systemd[1]: Starting A high performance web server and a reverse proxy server...
Feb 23 00:27:30 server systemd[1]: Started A high performance web server and a reverse proxy server.
Nginx should now be serving your domain name. You can test this by navigating to http://your_domain.
Now all that's left is to configure your router to expose ports 80 and 443 to the public so that users outside your network can access your server from anywhere in the world.
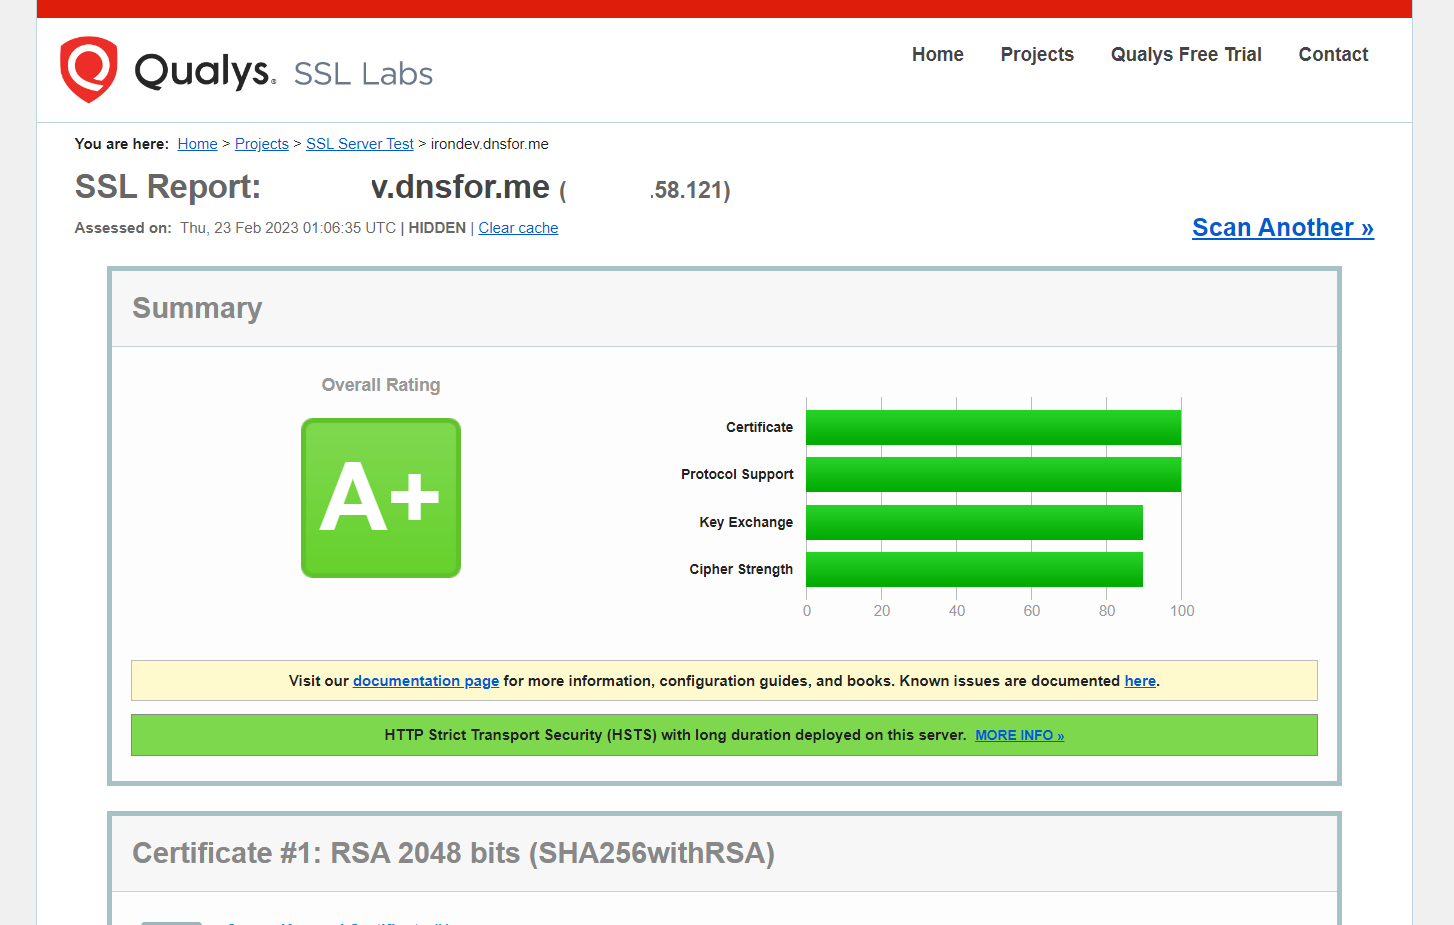
Well done! Provided you have completed all the preceding instructions I outlined in this documentation, you now possess a robust, industry-grade nginx reverse-proxy load-balancing server with optimal SSL integration.